Multidimensional Game
Some time ago, I thought - It would be cool to be able to say: “I created a 4D game!”. So, I decided to create one. During the process of thinking, I figured out that 4+D game sounds even cooler. And here we are.
This is my first and hopefully not last post about me creating a multidimensional game. There will most likely be a lot of math, rendering pipelines, bugs, weird objects that I don’t know if they look correct because we’re unable to judge that because we don’t think in more than 3D, and a lot of fun after actually creating the game.
I want to blog about it because I already see that I forget how math and stuff work. I’m writing this to be able to come back and see. Maybe it’s going to be useful for someone in the future.
In this very first post, I’ll explain my journey to generating hypercubes (cubes in usually more than three dimensions) in a specific way, which allows me to present it nicely in 3D.
I don’t know all this
Before we start, I want to say that I don’t know this stuff. I’m learning and I will make mistakes. If I make one, and you care enough, please ping me on email or something. Always keen to learn more.
Baby steps
So, like I said, I don’t know much about making games and multidimensional math. Before committing to making such a game, I wanted to see if I can wrap my mind around math and present something that makes sense. Wanted to generate a hypercube of any (3+) dimensions, be able to move and rotate it and present it using 3D tools. I didn’t want to use a full-blown gaming engine and ready-made libraries for multidimensional math. The first goal was to create as much from scratch as possible. So, decided to go with Python, pygraph and a small help with scipy.
Python because it’s Python and it just works. Pygraph because it can display mesh with colored faces and that’s exactly what I wanted. Scipy because it can triangulate and that’s exactly what I don’t want to learn at this point - if I write mesh and coloring faces from scratch, I can live with scipy triangulating stuff for me.
Presenting 3D cube
Presenting a 3D cube is quite trivial these days. There are two ways that I considered - presenting a cube mesh using one color with shadows, or coloring every of the cube faces with its own color. It turned out that pygraph doesn’t support shadows, so I went the colorful way. Which complicates stuff quite a lot with 4+D as I learned :)
3D cube mesh
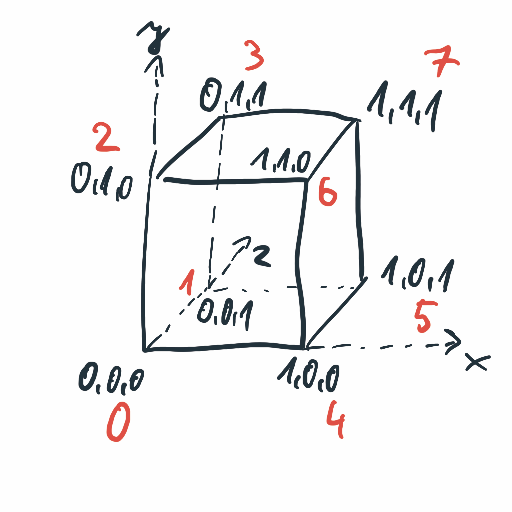
We’ll focus on cubes with edges of length 1, originated in the point 0, 0, 0. Vertices of a 3D cube are quite simple. You just take all the possible zeros and ones of length 3, so:
x, y, z
-------
0, 0, 0
0, 0, 1
0, 1, 0
0, 1, 1
1, 0, 0
1, 0, 1
1, 1, 0
1, 1, 1
What’s not so trivial is logically creating faces of the cube mesh - the triangles that are going to be presented by OpenGL on the screen. It’s not trivial, but in 3D it’s still not much work to do it manually. We’re going to do it now just to explicitly show what the code needs to do.
Let’s keep all the vertices in an array:
    x, y, z
    -------
[0] 0, 0, 0
[1] 0, 0, 1
[2] 0, 1, 0
[3] 0, 1, 1
[4] 1, 0, 0
[5] 1, 0, 1
[6] 1, 1, 0
[7] 1, 1, 1
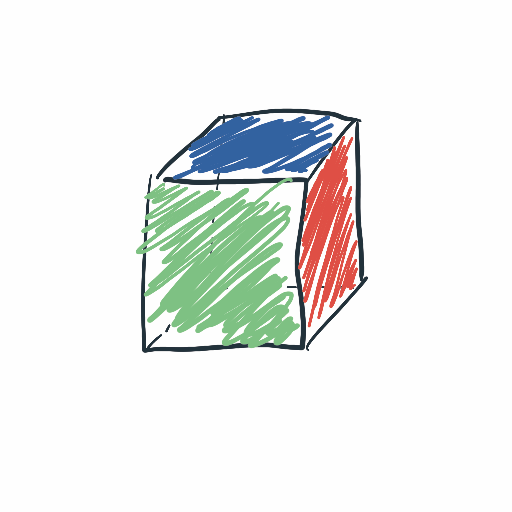
So, the cube looks like this:
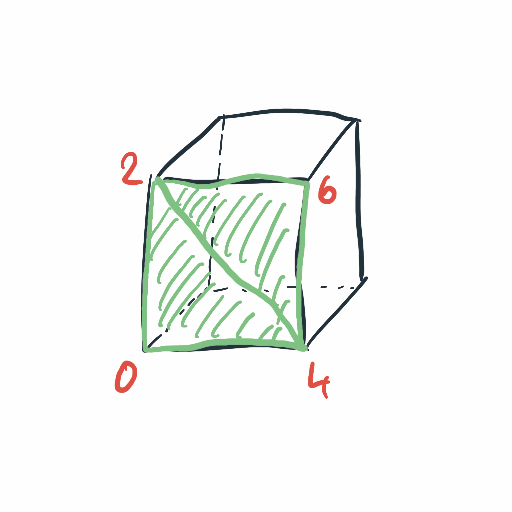
Every face of the cube consists of two triangles. The triangles are represented by indices of three vertices. E.g. the front face can be represented by these two:
face 0.0: 0, 2, 4
face 0.1: 6, 2, 4
Doing the same with other faces we end up with:
face 0.0: 0, 2, 4
face 0.1: 6, 2, 4

face 1.0: 0, 2, 1
face 1.1: 3, 2, 1

face 2.0: 4, 5, 6
face 2.1: 7, 5, 6

face 3.0: 1, 3, 5
face 3.1: 7, 3, 5

face 4.0: 2, 3, 6
face 4.1: 7, 3, 6

face 5.0: 0, 1, 4
face 5.1: 5, 1, 4
Now, in order to nicely display the cube, we need to assign colors to faces. One color for two triangles of given face:
face 0.0: 0, 2, 4 - red
face 0.1: 6, 2, 4 - red

face 1.0: 0, 2, 1 - green
face 1.1: 3, 2, 1 - green

face 2.0: 4, 5, 6 - blue
face 2.1: 7, 5, 6 - blue

face 3.0: 1, 3, 5 - yellow
face 3.1: 7, 3, 5 - yellow

face 4.0: 2, 3, 6 - cyan
face 4.1: 7, 3, 6 - cyan

face 5.0: 0, 1, 4 - magenta
face 5.1: 5, 1, 4 - magenta
Having all this information we finally can create mesh data, color it and display. Full listing of a simple Qt window displaying such a cube:
#!/usr/bin/env python3

"""
requirements.txt:
PyQt5==5.15.1
pyqtgraph
pyopengl
numpy
"""

import sys
import pyqtgraph.opengl as gl
import numpy as np

from PyQt5.QtGui import *
from PyQt5.QtCore import *
from PyQt5.QtWidgets import *


app = QApplication(sys.argv)
window = QWidget()
window.setMinimumSize(QSize(400, 400))

layout = QGridLayout()
window.setLayout(layout)

w = gl.GLViewWidget()
w.opts['distance'] = 5

axis = gl.GLAxisItem()
axis.scale(2, 2, 2)
w.addItem(axis)

vertices = [
    [0, 0, 0],
    [0, 0, 1],
    [0, 1, 0],
    [0, 1, 1],
    [1, 0, 0],
    [1, 0, 1],
    [1, 1, 0],
    [1, 1, 1]
]

faces = [
    [0, 2, 4],
    [6, 2, 4],

    [0, 2, 1],
    [3, 2, 1],

    [4, 5, 6],
    [7, 5, 6],

    [1, 3, 5],
    [7, 3, 5],

    [2, 3, 6],
    [7, 3, 6],

    [0, 1, 4],
    [5, 1, 4]
]

# The 4th values of 1 are for alpha
colors = [
    [1, 0, 0, 1],
    [1, 0, 0, 1],

    [0, 1, 0, 1],
    [0, 1, 0, 1],

    [0, 0, 1, 1],
    [0, 0, 1, 1],

    [1, 1, 0, 1],
    [1, 1, 0, 1],

    [0, 1, 1, 1],
    [0, 1, 1, 1],

    [1, 0, 1, 1],
    [1, 0, 1, 1]
]

mesh_data = gl.MeshData(
    vertexes=vertices, faces=faces, faceColors=colors)

cube_item = gl.GLMeshItem(
    meshdata=mesh_data, drawEdges=True, edgeColor=(0, 0, 0, 1), smooth=False)

w.addItem(cube_item)

layout.addWidget(w)

window.show()
sys.exit(app.exec_())
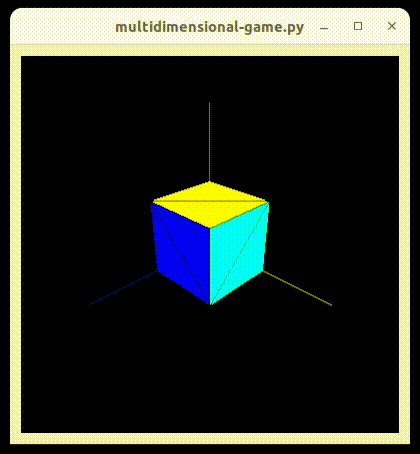
We get this simple cube:
Presenting 4D cube
Presenting 4D cube is a bit trickier. Of course, we could just hard code everything, but let’s not do this. We want a generic approach to be able to generate and present a cube of any dimensions.
What we know from the 3D cube section, we need to:
- Generate vertices of the cube.
- Know which vertices build a given face.
- Assign one color per face.
Generating vertices
Generating vertices of an ND cube is as simple as:
vertices = list(itertools.product([0, 1], repeat=N))
This will generate all the needed vertices consisting of 0 and 1, of length N. For 4D:
0, 0, 0, 0
0, 0, 0, 1
0, 0, 1, 0
0, 0, 1, 1
0, 1, 0, 0
0, 1, 0, 1
0, 1, 1, 0
0, 1, 1, 1
1, 0, 0, 0
1, 0, 0, 1
1, 0, 1, 0
1, 0, 1, 1
1, 1, 0, 0
1, 1, 0, 1
1, 1, 1, 0
1, 1, 1, 1
Logically assigning vertices to faces
We have a list of vertices, now we need to know how to build faces of the cube with them.
As of now, the cube is not rotated, so each of its faces is parallel to one of the canonical axes. With this, we can fairly easy generate vertices of all the faces. Consider the front face of a 3D cube.
The face consist of vertices
0, 0, 0
1, 0, 0
1, 1, 0
0, 1, 0

Now, the back face of the cube
0, 0, 1
1, 0, 1
1, 1, 1
0, 1, 1
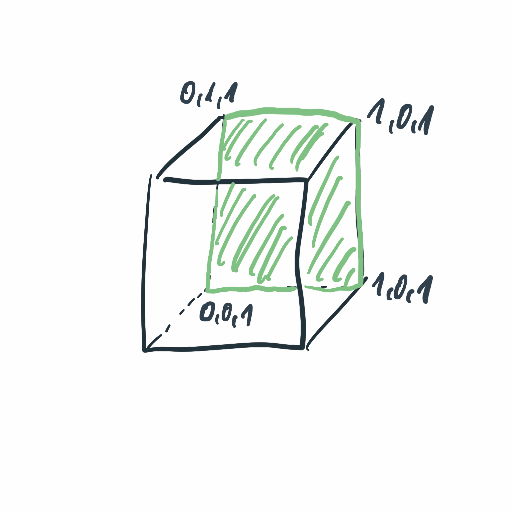
I think we can see a pattern here. A consists of all possible vertices with one axis constant.
In order to generate faces of a 3D cube, we should:
- Generate all possible vertices in 2D
- Insert 0 and 1 in all possible places of the vertices
Point 2 means, if there’s a 2D vertex 0, 1 then 0 or 1 can be inserted in three places:
 0, 1
^  ^  ^
So, all possible 3D vertices we can get from this 2D one are:
0, 1, 0
0, 1, 1

0, 0, 1
0, 1, 1

0, 0, 1
1, 0, 1
Python generating all possible faces of an ND cube looks like this:
vs = [list(v) for v in itertools.product([0, 1], repeat=(N-1))]
faces = []

for i in [0, 1]:
    for pos_to_insert in range(N):
        face = []
        for v in vs:
            vertex = list(v)
            vertex.insert(pos_to_insert, i)
            face.append(vertex)

        faces.append(face)
For N=4 we end up with:
[
  [
    [0, 0, 0, 0], [0, 0, 0, 1], [0, 0, 1, 0], [0, 0, 1, 1], [0, 1, 0, 0], [0, 1, 0, 1], [0, 1, 1, 0], [0, 1, 1, 1]
  ],
  [
    [0, 0, 0, 0], [0, 0, 0, 1], [0, 0, 1, 0], [0, 0, 1, 1], [1, 0, 0, 0], [1, 0, 0, 1], [1, 0, 1, 0], [1, 0, 1, 1]
  ],
  [
    [0, 0, 0, 0], [0, 0, 0, 1], [0, 1, 0, 0], [0, 1, 0, 1], [1, 0, 0, 0], [1, 0, 0, 1], [1, 1, 0, 0], [1, 1, 0, 1]
  ],
  [
    [0, 0, 0, 0], [0, 0, 1, 0], [0, 1, 0, 0], [0, 1, 1, 0], [1, 0, 0, 0], [1, 0, 1, 0], [1, 1, 0, 0], [1, 1, 1, 0]
  ],
  [
    [1, 0, 0, 0], [1, 0, 0, 1], [1, 0, 1, 0], [1, 0, 1, 1], [1, 1, 0, 0], [1, 1, 0, 1], [1, 1, 1, 0], [1, 1, 1, 1]
  ],
  [
    [0, 1, 0, 0], [0, 1, 0, 1], [0, 1, 1, 0], [0, 1, 1, 1], [1, 1, 0, 0], [1, 1, 0, 1], [1, 1, 1, 0], [1, 1, 1, 1]
  ],
  [
    [0, 0, 1, 0], [0, 0, 1, 1], [0, 1, 1, 0], [0, 1, 1, 1], [1, 0, 1, 0], [1, 0, 1, 1], [1, 1, 1, 0], [1, 1, 1, 1]
  ],
  [
    [0, 0, 0, 1], [0, 0, 1, 1], [0, 1, 0, 1], [0, 1, 1, 1], [1, 0, 0, 1], [1, 0, 1, 1], [1, 1, 0, 1], [1, 1, 1, 1]
  ]
]
Edges
You know, vertices are cool but for presenting 4+D cubes in 3D we’ll need edges at some point, in order to calculate an intersection of 4D edge with 3D hyperplane. For now, let’s just assume we need edges.
If we have a list of faces like above, then discovering the edges of every face is quite simple. We generate cubes of size 1, so all edges of all faces are going to have length 1. That means we can iterate over vertices of a face and if the distance between two given vertices is 1, that’s an edge.
def vertex_distance(a, b):
    s = sum([abs(ai - bi)**2 for ai, bi in zip(a, b)])
    return math.sqrt(s)


edges_of_faces = []

for face in faces:
    edges = set()
    for v0 in face:
        for v1 in face:
            if vertex_distance(v0, v1) == 1:
                # Sort in order to remove duplicates while adding to set().
                edge = tuple(sorted((tuple(v0), tuple(v1))))
                edges.add(edge)

    edges_of_faces.append(edges)
For 4D we end up with:
[
    {
        ((0, 0, 1, 0), (0, 0, 1, 1)),
        ((0, 0, 0, 0), (0, 0, 0, 1)),
        ((0, 0, 0, 0), (0, 0, 1, 0)),
        ((0, 0, 0, 1), (0, 0, 1, 1)),
        ((0, 0, 1, 1), (0, 1, 1, 1)),
        ((0, 1, 1, 0), (0, 1, 1, 1)),
        ((0, 0, 0, 1), (0, 1, 0, 1)),
        ((0, 1, 0, 0), (0, 1, 0, 1)),
        ((0, 1, 0, 1), (0, 1, 1, 1)),
        ((0, 0, 0, 0), (0, 1, 0, 0)),
        ((0, 0, 1, 0), (0, 1, 1, 0)),
        ((0, 1, 0, 0), (0, 1, 1, 0))
    },
    ...
]
Ok, so we have vertices building edges now. But, what’s not cool in that is that we store the same vertices more than once, e.g. (0, 0, 0, 0):
[
    {
        ((0, 0, 1, 0), (0, 0, 1, 1)),
     >> ((0, 0, 0, 0), (0, 0, 0, 1)),
     >> ((0, 0, 0, 0), (0, 0, 1, 0)),
        ((0, 0, 0, 1), (0, 0, 1, 1)),
        ((0, 0, 1, 1), (0, 1, 1, 1)),
        ((0, 1, 1, 0), (0, 1, 1, 1)),
        ((0, 0, 0, 1), (0, 1, 0, 1)),
        ((0, 1, 0, 0), (0, 1, 0, 1)),
        ((0, 1, 0, 1), (0, 1, 1, 1)),
     >> ((0, 0, 0, 0), (0, 1, 0, 0)),
        ((0, 0, 1, 0), (0, 1, 1, 0)),
        ((0, 1, 0, 0), (0, 1, 1, 0))
    },
    ...
]
We want to store vertices once and refer to these vertices from the edges:
def vertex_distance(a, b):
    s = sum([abs(ai - bi)**2 for ai, bi in zip(a, b)])
    return math.sqrt(s)

vertices = list(itertools.product([0, 1], repeat=N))
vertices = [list(e) for e in vertices]

edges_of_faces = []

for face in faces:
    edges = set()
    for v0 in face:
        for v1 in face:
            if vertex_distance(v0, v1) == 1:
                index_i = vertices.index(v0)
                index_j = vertices.index(v1)

                edge = tuple(sorted((index_i, index_j)))
                edges.add(edge)

    edges_of_faces.append(edges)
This gives us vertices:
[0]: 0, 0, 0, 0
[1]: 0, 0, 0, 1
[2]: 0, 0, 1, 0
[3]: 0, 0, 1, 1
[4]: 0, 1, 0, 0
[5]: 0, 1, 0, 1
[6]: 0, 1, 1, 0
[7]: 0, 1, 1, 1
[8]: 1, 0, 0, 0
[9]: 1, 0, 0, 1
[10]: 1, 0, 1, 0
[11]: 1, 0, 1, 1
[12]: 1, 1, 0, 0
[13]: 1, 1, 0, 1
[14]: 1, 1, 1, 0
[15]: 1, 1, 1, 1
and edges_of_faces:
[
    {
        (0, 1), (0, 4), (1, 5), (3, 7), (4, 6), (5, 7), (2, 3), (6, 7), (0, 2), (4, 5), (2, 6), (1, 3)
    },
    {
        (0, 1), (10, 11), (2, 10), (8, 10), (2, 3), (0, 2), (8, 9), (9, 11), (0, 8), (1, 3), (1, 9), (3, 11)
    },
    {
        (0, 1), (0, 4), (9, 13), (1, 5), (4, 12), (12, 13), (5, 13), (4, 5), (8, 9), (8, 12), (0, 8), (1, 9)
    },
    {
        (0, 4), (10, 14), (2, 10), (4, 6), (4, 12), (6, 14), (8, 10), (0, 2), (2, 6), (8, 12), (0, 8), (12, 14)
    },
    {
        (10, 11), (9, 13), (10, 14), (8, 10), (12, 13), (8, 9), (11, 15), (8, 12), (9, 11), (13, 15), (14, 15), (12, 14)
    },
    {
        (4, 6), (4, 12), (6, 14), (5, 7), (5, 13), (12, 13), (6, 7), (4, 5), (7, 15), (13, 15), (14, 15), (12, 14)
    },
    {
        (10, 11), (10, 14), (3, 7), (2, 10), (6, 14), (2, 3), (6, 7), (2, 6), (11, 15), (7, 15), (14, 15), (3, 11)
    },
    {
        (9, 13), (1, 5), (3, 7), (5, 7), (5, 13), (11, 15), (7, 15), (9, 11), (13, 15), (1, 3), (1, 9), (3, 11)
    }
]
Now we have a full-fledged cube data - all the vertices logically divided into edges and faces. We can start thinking about the math needed for presenting hypercubes in a 3D scene.
The full code generating cube data:
#!/usr/bin/env python3

import math
import itertools


def vertex_distance(a, b):
    s = sum([abs(ai - bi)**2 for ai, bi in zip(a, b)])
    return math.sqrt(s)


def generate_vertices_and_faces(dimension):
    N = dimension

    # Generate all vertices
    vertices = list(itertools.product([0, 1], repeat=N))
    vertices = [list(e) for e in vertices]

    # Generate all vertices of one dimension lower
    vs = list(itertools.product([0, 1], repeat=(N-1)))
    # print(vs)

    # Generate faces. Face consists of all its vertices.
    faces = []

    for i in [0, 1]:
        for pos_to_insert in range(N):
            face = []
            for v in vs:
                vertex = list(v)
                vertex.insert(pos_to_insert, i)

                face.append(vertex)
            faces.append(face)

    # Discover edges of faces. Edge consists of indices of two vertices creating edge.
    edges_of_faces = []

    for face in faces:
        edges = set()
        for i in range(len(face)):
            for j in range(len(face)):
                if vertex_distance(face[i], face[j]) == 1:
                    index_i = vertices.index(face[i])
                    index_j = vertices.index(face[j])

                    # Sort in order to remove duplicates while adding to set().
                    edge = tuple(sorted((index_i, index_j)))

                    edges.add(edge)

        edges_of_faces.append(edges)

    return vertices, edges_of_faces


vertices, edges_of_faces = generate_vertices_and_faces(4)


print('Vertices:')
for i in range(len(vertices)):
    print(f'[{i}]: {vertices[i]}')

print('\nEdges of faces:')
for i in range(len(edges_of_faces)):
    face = edges_of_faces[i]
    print(f'Face {i}:')
    for v0, v1 in face:
        print(f'  {v0} <-> {v1}')
Why all this?
To understand why we need such acrobatics to just present a hypercube, we need to understand how it’s going to be presented.
There are many approaches to present higher dimensions in 3D. I took this:
In order to present an ND object in an (N-1)D, calculate the intersection of this object with (N-1)D hyperplane.
What does it mean? If we’d like to present a 3D cube for a 2D person, we’d pick an arbitrary 2D plane, cut our cube with it (calculate intersection), connect the intersection points and present the result 2D polygon to the 2D person.

When a 2D plane cuts a 3D cube, each face is intersected in 0, 1 or 2 points. To fully present the result polygon, we’re remembering colors of the cut faces. Thanks to that, we have colorful edges of the polygon.
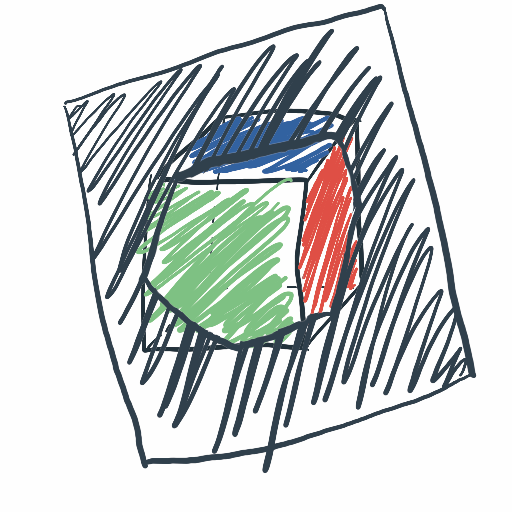
Similar with 4D. You have a 4D cube, you cut it with a 3D plane (basically a 3D space), connect the intersection points and present the result 3D object to the 3D person. An example 4D cube (after some rotations):
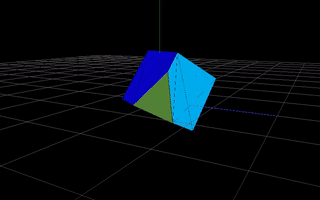
As you can see here, each face of the result 3D object is of a different color. The approach is analogous - after intersection, remember colors of the 4D faces where given intersection points come from and use this color to paint the result face of a 3D object. 4D cube has 8 faces, the 3D representation should have up to 8 faces as well.
And that’s why we wanted to have vertices logically divided into faces and edges. We can assign a color to one face, do the math and present the result 3D object - all this without losing the original colors.
How the math is done in Python? I’ll explain it in the next posts. I realized this one is growing and let’s cut it here.